


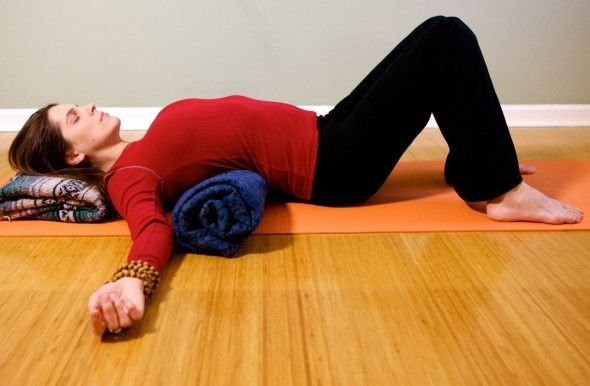
Restorative Yoga:
Restorative Yoga is a gentle form of yoga that uses supported poses, pillows, blankets and mindful breathing to promote deep relaxation and reduce physical tension. It focuses on comfort and stillness rather than intense stretching or strenuous movements.
Restorative Yoga draws on Hatha Yoga, an established tradition of physical postures and breathing practices.
During the 20th century Indian yoga teacher B.K.S. Iyengar popularized the use of props such as blankets, blocks and chairs to support poses and reduce physical strain.
In 1974 American yoga teacher Judith Hanson Lasater helped establish Restorative Yoga as a dedicated practice focused on deep rest and relaxation
How Restorative Yoga May Help Your Lower Back
Restorative yoga allows you to rest in supported positions while paying attention to your breathing and body alignment. Unlike faster yoga styles it emphasizes comfort, relaxation and gentle awareness instead of continuous movement.
For some people restorative yoga for lower back pain may help reduce stress, ease feelings of muscle tension and encourage comfortable movement. A relaxed practice can also help you become more aware of positions that feel supportive and those that increase discomfort.
However lower back pain can have different causes and not every pose suits every person. Choose movements that feel comfortable, breathe naturally and avoid forcing your spine into a particular position.
7 Restorative yoga For lower back pain to Try at Home
Before starting, choose a quiet space and prepare a yoga mat, pillows and folded blankets. Begin with a short session and adjust each pose to your comfort level.
1. Supported Child’s Pose
Supported Child’s Pose lets you rest your upper body while gently changing the position of your hips and spine. A pillow can make this pose more comfortable if bending forward feels manageable.
How to practice:
- Kneel on a yoga mat and place a pillow or folded blanket in front of you.
- Slowly lower your torso onto the support.
- Rest your head on the pillow and turn it to one side.
- Relax your arms wherever they feel most comfortable.
- Stay for 30 seconds to two minutes while breathing naturally.
Avoid pushing your hips toward your heels or forcing your knees to bend deeply. If kneeling or bending forward increases your discomfort, skip this pose and try a more comfortable resting position.
2. Legs Up the Wall
Legs Up the Wall provides a supported resting position that requires little effort. Many people enjoy this pose after a busy day because it allows them to pause and breathe calmly.
How to practice:
- Sit sideways beside a wall with a folded blanket nearby.
- Lower yourself onto your side and gently turn onto your back as you bring your legs up the wall.
- Move your hips farther from the wall if your hamstrings feel tight.
- Place a small folded towel under your head if needed.
- Rest for one to five minutes while breathing comfortably.
Key Points to Know:Keep your back in a natural relaxed position instead of forcing it flat against the floor. Stop if you experience pressure or discomfort.
3. Supported Reclined Bound Angle Pose
This pose allows your hips to open gently while your back rests on the floor. Supporting your thighs helps you avoid forcing your knees downward.
How to practice:
- Lie on your back with a pillow under your head.
- Bring the soles of your feet together and allow your knees to move outward.
- Place cushions or folded blankets beneath both thighs.
- Let your arms rest naturally beside your body.
- Stay for one to three minutes if the position feels comfortable.
Key Points to Know:Do not press your knees toward the floor. If you experience pulling or discomfort around your hips or back, bring your knees closer together and add more support.
4. Supported Bridge Pose
Supported Bridge involves a gentle lift beneath your pelvis. Some people find this position comfortable, but others may experience increased discomfort. Use a low, stable support and avoid creating a deep arch in your back.
How to practice:
- Lie on your back with your knees bent and feet flat on the floor.
- Keep your feet approximately hip-width apart.
- Lift your hips gently only if the movement feels comfortable.
- Place a suitable yoga block on its lowest height or a firm, purpose-made support beneath your sacrum.
- Allow the support to hold your weight loss without forcing your back into an arch.
Must-Know Facts:Remain in the position for 20–30 seconds if comfortable. Remove the support carefully before lowering your hips. Never place a hard block directly beneath your lumbar spine and skip this pose if it increases your pain.
5. Gentle Knees-to-Chest Pose
Knees-to-Chest introduces a gentle movement that some people find soothing. However bending the spine forward may aggravate certain back problems so start with one leg at a time.
How to practice:
- Lie on your back with both knees bent.
- Slowly bring one knee toward your chest.
- Hold behind your thigh instead of pulling hard on your kneecap.
- Keep your shoulders relaxed and breathe naturally.
- Hold for 10–20 seconds before returning your foot to the floor.
- Repeat on the other side if comfortable.
Avoid pulling forcefully or rocking your body. If the position increases pain, stop and choose another pose.
6. Gentle Reclined Spinal Twist
A reclined twist introduces a small amount of rotation while your body rests on the floor. Deep twisting may aggravate certain conditions, so keep the movement small and use pillows for support.
How to practice:
- Lie on your back with your knees bent and feet flat on the mat.
- Slowly allow both knees to move a short distance to one side.
- Place a pillow beneath your knees if they do not comfortably reach the floor.
- Keep your shoulders relaxed without forcing them downward.
- Stay for 15–30 seconds if comfortable.
- Return to the center and repeat on the other side if it feels suitable.
Things You Need to Know:Your knees do not need to touch the floor. Stop if you experience sharp pain, tingling, or discomfort that spreads down your leg.
7. Constructive Rest Pose
Constructive Rest offers a simple alternative when other positions feel too demanding. It lets you relax without requiring a deep stretch or complicated movement.
How to practice:
- Lie on your back with your knees bent.
- Place your feet flat on the floor, about hip-width apart.
- Allow your arms to rest beside your body.
- Adjust the position of your head and neck until they feel supported.
- Breathe comfortably for two to five minutes.
Do not deliberately press your lower back into the floor. Instead, allow your body to settle into a natural, comfortable position.
Simple Tips For Restorative yoga For lower back pain
The best lower back restorative yoga poses are the ones you can perform comfortably and consistently. Follow these practical tips to make your routine easier to manage.
- Use enough support: Pillows, folded blankets, and suitable yoga props can make resting positions more comfortable.
- Start with short sessions: Begin with five to ten minutes and adjust the duration according to how you feel.
- Breathe naturally: Relaxed breathing can help you settle into a pose without unnecessary muscle tension.
- Avoid forcing stretches: Do not push your body into a position simply because it looks correct in a photograph.
- Change positions slowly: Move carefully when getting up or transitioning between poses.
- Stay consistent: A gentle routine may be easier to maintain than an occasional long session that leaves you uncomfortable.
Important note:When exploring restorative poses for lower back pain remember that holding a stretch longer does not automatically produce better results. Comfort and your body’s response matter more than the duration of a pose.
Creating a Gentle Routine For Your Hips and Back
Your hips and lower back work together during many everyday activities. Long periods of sitting may make movement feel stiff, although the reasons for stiffness vary. Supported positions can provide an opportunity to relax and notice which movements feel comfortable.
A routine of restorative yoga for hips and lower back might include Constructive Rest, Legs Up the Wall, and Supported Child’s Pose if kneeling feels comfortable. You do not need to complete all seven poses during every session.
A short practice of restorative yoga for lower back pain can begin with one or two positions that feel supportive. Spend a few minutes breathing naturally, then assess how you feel before adding another pose.
You can also adapt restorative yoga for lower back comfort by placing cushions beneath your knees, supporting your thighs or choosing a neutral resting position instead of a deep stretch.
Mistakes to Avoid
People sometimes assume that deeper stretches or longer holds will produce quicker relief. However forcing your body beyond a comfortable range may increase irritation.
Avoid these common mistakes:
- Holding your breath while settling into a pose.
- Forcing your knees, hips or spine into a specific position.
- Using unstable cushions or placing hard props beneath sensitive areas.
- Continuing a movement that creates sharp or worsening pain.
- Expecting yoga alone to resolve every cause of back discomfort.
Choose restorative yoga poses for back pain according to your comfort rather than how advanced they appear. You can modify a position, reduce the range of movement or leave it out entirely.
The same principle applies when selecting restorative yoga poses for lower back pain: prioritize gentle movement and individual comfort over perfecting the pose.
Warning Signs You Should Not Ignore
- Seek urgent medical care if you experience loss of bladder or bowel control, difficulty passing urine, numbness around the groin or severe or worsening leg weakness.
- Consult a healthcare professional if your back pain persists, keeps returning, worsens, follows an injury or affects daily activities.
- Get professional advice before starting yoga if you have an existing back condition, recently had surgery, have osteoporosis or experience pain that travels down your leg.
- Follow professional guidance to identify the possible cause of your pain and choose safe, suitable exercises.
Sum up about Restorative yoga
Gentle yoga can provide an opportunity to relax, explore comfortable positions and improve awareness of movement. The seven poses in this guide offer different options for a home routine but you should only continue with positions that do not worsen your symptoms.With a careful approach restorative yoga for lower back pain may become one part of a broader plan for managing discomfort. Start slowly, use adequate support and seek professional guidance when needed. Focus on comfortable movement and gradual progress instead of expecting immediate results.
Frequently Asked Questions (FAQs)
1. What Is Restorative Yoga?
Restorative Yoga is a gentle practice that uses supported poses and relaxed breathing to promote comfort and relaxation.
2. Can Restorative Yoga Help With Lower Back Pain?
It may help ease muscle tension and improve comfort but results depend on the cause of your pain.
3. Which Yoga Pose Is Best for Lower Back Pain?
Constructive Rest may be a gentle starting point but the best pose depends on your symptoms and comfort.
4. How Long Should I Hold Each Yoga Pose?
Start with 20–60 seconds and adjust the duration based on your comfort level.
5. Can Beginners Practice Restorative Yoga?
Yes beginners can start with simple, supported poses and gentle breathing.
6. Can I Practice Restorative Yoga Every Day?
You may practice daily if the poses feel comfortable and do not worsen your symptoms.
7. What Equipment Do I Need for Restorative Yoga?
A yoga mat, pillows, folded blankets and supportive cushions can help you get started.
8. Can Restorative Yoga Cure Lower Back Pain?
No. It cannot guarantee a cure. It may support comfort as part of an appropriate care plan.
9. Should I Stop Yoga if My Back Hurts More?
Yes. stop any pose that increases your pain, causes tingling or sends pain down your leg.
10. When Should I See a Doctor for Lower Back Pain?
Seek medical advice if pain persists or worsens. Get urgent care for new bladder or bowel problems, groin numbness or significant leg weakness.
